Thanks for the comments.
The only nozzle size I've used so far was 1/16 inch, the smallest nozzle I could find in our workshop. I wanted to the shot to last long so that I could pulse it and try out the trigger mechanisms. Range was good considering how small the nozzle was.
The gun is very easy to handle even with the bad grip and handle. Its good handling comes from its balance; weight near the rear balances weight at the front. About a week ago, I added a rifle strap, which balances the weight even more. I'll have to take a picture.
The gun isn't unwieldy at all. It's 2.5 inches thick on the bottom and 3.5 inches thick on the top, which means that the user keeps it close to his body. It's short in length for a homemade (28 inches) and is actually shorter than a CPS 2000 (33 inches). One thing about this water gun exceeded my expectations: how easy it was to hold and handle. I designed it for water wars, so the gun handles well.
Riptide CPS Prototype
-
Drenchenator

- Posts: 807
- Joined: Fri Jun 18, 2004 12:00 pm
Re: Riptide CPS Prototype
The Drenchenator, also known as Lt. Col. Drench.
-
C-A_99

- Posts: 1502
- Joined: Tue Aug 01, 2006 11:09 pm
Re: Riptide CPS Prototype
Did you smooth out the cuts on the plastic boards? From the pictures, they almost look like they'd cut into your hand when handling them. The simplest way I can think of to improve ergonomics there is to simply wrap tape around the handles, and maybe trim them to take up less area if necessary. But as you said, you're going to attach handles to them anyway.
It seems that you used small, inconspicious check valves throughout the design. Are they all brass valves?
It seems that you used small, inconspicious check valves throughout the design. Are they all brass valves?
-
JLspacemarine

- Posts: 120
- Joined: Sat Jul 01, 2006 3:06 am
Re: Riptide CPS Prototype
IMO this is something that outclasses performance in terms of priority when building homemades for water wars. I'd use an ergonomic water gun which has reasonable power rather than a huge bulky thing that shoots like a fire hose but that is a pain in the a$$ to manoeuver. (no offence to Super Canon IIDrenchenator wrote:One thing about this water gun exceeded my expectations: how easy it was to hold and handle. I designed it for water wars, so the gun handles well.
Armory: AS Hydroblitz (x2), MI FlashFlood, STE TripleShot, XP Backfire, XP 215, XP 105, XXP 175, Big Bottle BLaster(x2), SC Power Pak, SpeedLoader1000, SpeedLoader 1500, SpeedLoader Double-Cross 3000, CPS Splashzooka (x2), CPS 1200, CPS 1500,CPS 2100, CPS 2000 Mk2, CPS 1-3-5
-
Drenchenator
- Posts: 807
- Joined: Fri Jun 18, 2004 12:00 pm
Re: Riptide CPS Prototype
Okay, I've converted the shot video to MPEG-1; now, it's just under 3 megs and not just over 33 megs like before.
To show how the torque arm works and how well the trigger mechanism work together, I taped its action for a few cycles. One thing that I didn't notice when I shot the gun was that the connecting rod pushes out the casing slightly upon opening the valve. That's a minor problem, but one I should fix eventually. In all, the cycling is clean and it closes quickly.
I attached a simple grip and sanded the gun around the edges, especially on the pump handle. I doesn't scratch me up anymore, which is good--before I sanded it, I would get blisters on my hand's webbing before my forefinger and thumb. Now, with a 1" PVC piece for a grip, the only thing I get is a smooth grip on the gun.
I peeled off all the paper. Now you always see through it.
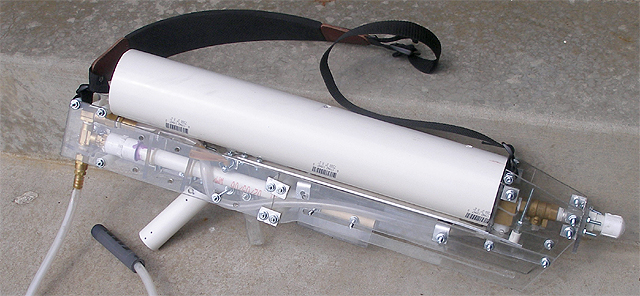
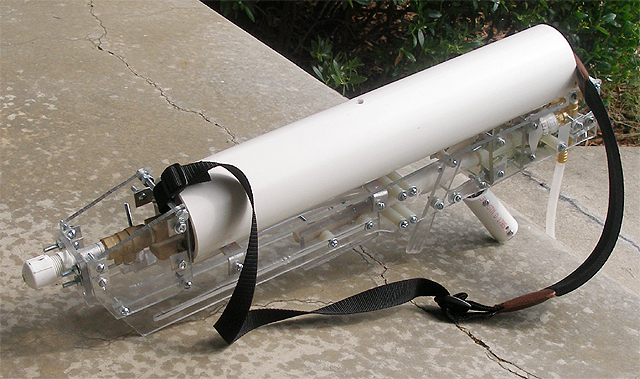

I don't think many people realized the gun's size. I didn't want it to be big, so I looked to previously done guns: stock CPS guns. It's the same size as a CPS 3000. Prove it, you ask? Okay:

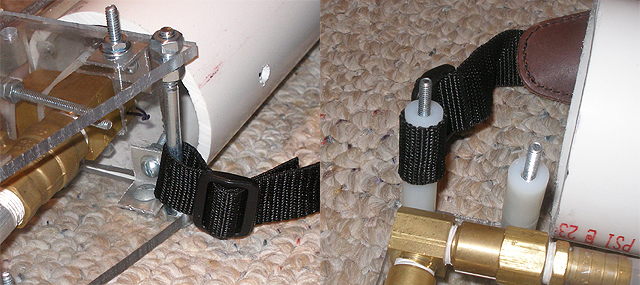
I added the rifle strap, and it worked perfectly. It's more comfortable than a CPS strap, but it did cost me ten dollars. I installed it by wrapping it and closing it around bolts at the ends of the gun.
Brass is heavy. I can't say it was the best choice, but it was a good choice. I know McMaster has very small PVC check valves that must weight a few grams only. Perhaps I'll use those in the future, but perhaps not. They may be so small as to restrict water flow into and out the pump.
Building an ergonomic water gun has been the task to catch up and fly past stock guns. I think this year, with your gun and my gun, we've passed stock guns, and we're to see many more awesome guns to come.
To show how the torque arm works and how well the trigger mechanism work together, I taped its action for a few cycles. One thing that I didn't notice when I shot the gun was that the connecting rod pushes out the casing slightly upon opening the valve. That's a minor problem, but one I should fix eventually. In all, the cycling is clean and it closes quickly.
I didn't smooth out the cuts until now, but believe me, they needed to be smoothed out. Here, Ben and I don't have much to sand other than files and sand paper, so sanding is tough. But when it needs to be done, you gotta do it.C-A_99 wrote:Did you smooth out the cuts on the plastic boards? From the pictures, they almost look like they'd cut into your hand when handling them. The simplest way I can think of to improve ergonomics there is to simply wrap tape around the handles, and maybe trim them to take up less area if necessary. But as you said, you're going to attach handles to them anyway.
I attached a simple grip and sanded the gun around the edges, especially on the pump handle. I doesn't scratch me up anymore, which is good--before I sanded it, I would get blisters on my hand's webbing before my forefinger and thumb. Now, with a 1" PVC piece for a grip, the only thing I get is a smooth grip on the gun.
I peeled off all the paper. Now you always see through it.
I don't think many people realized the gun's size. I didn't want it to be big, so I looked to previously done guns: stock CPS guns. It's the same size as a CPS 3000. Prove it, you ask? Okay:
I added the rifle strap, and it worked perfectly. It's more comfortable than a CPS strap, but it did cost me ten dollars. I installed it by wrapping it and closing it around bolts at the ends of the gun.
To save space, all valves are brass. I only solvent welded one connection, and that was where the pump rod meets a 1/2" threaded female fitting.C-A_99 wrote:It seems that you used small, inconspicious check valves throughout the design. Are they all brass valves?
Brass is heavy. I can't say it was the best choice, but it was a good choice. I know McMaster has very small PVC check valves that must weight a few grams only. Perhaps I'll use those in the future, but perhaps not. They may be so small as to restrict water flow into and out the pump.
I've held Super Cannon II (never used it though). It's really big. What's worse is that it lacks handles other than the ball valve's handle. There's nothing to hold onto, so Ben added a strap. Still, it doesn't hold up.JLspacemarine wrote:IMO this is something that outclasses performance in terms of priority when building homemades for water wars. I'd use an ergonomic water gun which has reasonable power rather than a huge bulky thing that shoots like a fire hose but that is a pain in the a$$ to manoeuver. (no offence to Super Canon II )
Building an ergonomic water gun has been the task to catch up and fly past stock guns. I think this year, with your gun and my gun, we've passed stock guns, and we're to see many more awesome guns to come.
Last edited by Drenchenator on Sat Jul 25, 2009 12:29 am, edited 1 time in total.
The Drenchenator, also known as Lt. Col. Drench.
-
C-A_99
- Posts: 1502
- Joined: Tue Aug 01, 2006 11:09 pm
Re: Riptide CPS Prototype
Nice method of adding straps. It eliminates the need to buy hooks, which is very good if you've got a strap with broken hook(s). Are you going to add a handle to the trigger itself? At the least, I'd think a bit of duct tape could be helpful. (since adding a handle might make it too big)
-
Drenchenator
- Posts: 807
- Joined: Fri Jun 18, 2004 12:00 pm
Re: Riptide CPS Prototype
A good thing about designing from scratch is that you can plan ahead based on the parts you know you'll have. I had the strap for DR-3, and planned to use hooks to attach it to DR-3; but two years later with the same, unused strap, I knew how to attach it and knew how to avoid any trouble with it.
What do you mean by a handle to the trigger? I used to have some duct tape attached to the trigger, before I sanded the trigger. I sanded the trigger to smooth it out--it's guaranteed to be touched often--and to avoid putting on it duct tape, which gives me sticky fingers after pulling the trigger.C-A_99 wrote:Are you going to add a handle to the trigger itself? At the least, I'd think a bit of duct tape could be helpful. (since adding a handle might make it too big)
The Drenchenator, also known as Lt. Col. Drench.
-
adronl

- Posts: 200
- Joined: Thu May 07, 2009 1:28 am
Re: Riptide CPS Prototype
So have you powered that thing up more by adding a second layer of latex. Also have you tried some gum rubber yet if that if that is a 3" tube it will be perfect for gum rubber. I would be willing to have an order sent to you so you and your bro can check it out  . You really stepped it up in design. I like it much better without the white it looks pretty cool now but I bet you can get some better range if you try.
-
Drenchenator
- Posts: 807
- Joined: Fri Jun 18, 2004 12:00 pm
Re: Riptide CPS Prototype
Thanks for the tips and positive comments, adronl.
I haven't added an extra layer, nor do I plan to. I never mentioned this gun's goal in this thread (I listed it in the thread for DR-3, though): I wanted CPS homemade with a very large pressure chamber volume, enough to last the majority of a battle. I could have put a reservoir on it--there's room--but I wanted a simple gun without complications. Power never mattered too much; I didn't want it to perform as the SoakerTag line does, yet I didn't need it to perform as Super Cannon II does. I accept its current range--as long as it slightly exceeds the CPS line, that is.
It rained after I got home from work, so I hope to test for range and output tomorrow.
I thank you for the offer for the gum rubber tubing. I have to decline it, though, because if I wanted to some, I can buy it; there is no need for you to send me some. Thank you anyway.
Last edited by Drenchenator on Sun Jul 26, 2009 11:52 am, edited 1 time in total.
The Drenchenator, also known as Lt. Col. Drench.
-
C-A_99
- Posts: 1502
- Joined: Tue Aug 01, 2006 11:09 pm
Re: Riptide CPS Prototype
By handle, I meant just about anything to soften it's impact on the finger(s). It seems that you've taken care of it's sharp edges though, so that's good. The pump however, doesn't seem to have much of a handle. Are you planning to add something to that? Also, what size is the PC case? (it appears to be 2 in.)
-
Drenchenator
- Posts: 807
- Joined: Fri Jun 18, 2004 12:00 pm
Re: Riptide CPS Prototype
The PC case is 3" schedule 40 PVC, and contributes to the gun's weight more than any other part. 2" PVC doesn't provide enough room for the expanded tubing, which takes up just over 3 inches in diameter when fully expanded. 3" approximates the diameter well; in a 4" pipe the tubing wobbles around and in a 2" pipe it can't expand.
The handle isn't bad. I sanded it around the edges and it feels sturdy. Granted, it's not the best handle, but it will do until I have time to design a better one. I still haven't.
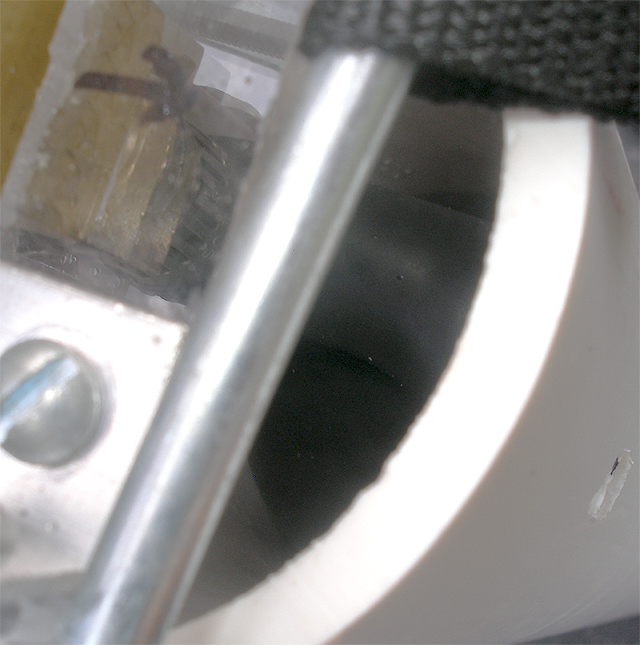
This morning I realized how packed some parts of the gun are and how vacant others are. The picture above shows "critical area" with the trigger depressed, showing how little additional room the trigger has to move forward. Another half inch, it runs against the bolts that hold the structure together. This was the hardest part: designing everything to fit in this critical area between the pump and the firing valve. Once you get past this, the gun is done; but before, it's not.
The handle isn't bad. I sanded it around the edges and it feels sturdy. Granted, it's not the best handle, but it will do until I have time to design a better one. I still haven't.
This morning I realized how packed some parts of the gun are and how vacant others are. The picture above shows "critical area" with the trigger depressed, showing how little additional room the trigger has to move forward. Another half inch, it runs against the bolts that hold the structure together. This was the hardest part: designing everything to fit in this critical area between the pump and the firing valve. Once you get past this, the gun is done; but before, it's not.
The Drenchenator, also known as Lt. Col. Drench.
-
C-A_99
- Posts: 1502
- Joined: Tue Aug 01, 2006 11:09 pm
Re: Riptide CPS Prototype
Yeah, I had a look at earlier pictures of that area. It appeared that you planned for those parts to help stop the trigger from moving farther than it needs to while in fact, you were having trouble getting things to fit in there.
For the PC case, you could probably make it much lighter by using thinwall/drainage pipe.
For the PC case, you could probably make it much lighter by using thinwall/drainage pipe.
-
Drenchenator
- Posts: 807
- Joined: Fri Jun 18, 2004 12:00 pm
Re: Riptide CPS Prototype
Yes, it was the other way around, but like many processes, it was step by step and came through a process of elimination. I knew where I needed to put structural components, and I knew that I can't change these component's placement. After that, I planned parts' sizes and weaved the parts through what was already there.It appeared that you planned for those parts to help stop the trigger from moving farther than it needs to while in fact, you were having trouble getting things to fit in there.
You put the furniture in the house only after the house is built. The same works here.
The Drenchenator, also known as Lt. Col. Drench.
-
Drenchenator
- Posts: 807
- Joined: Fri Jun 18, 2004 12:00 pm
Re: Riptide CPS Prototype
I finished some preliminary testing, but something odd came up that's never been addressed before.
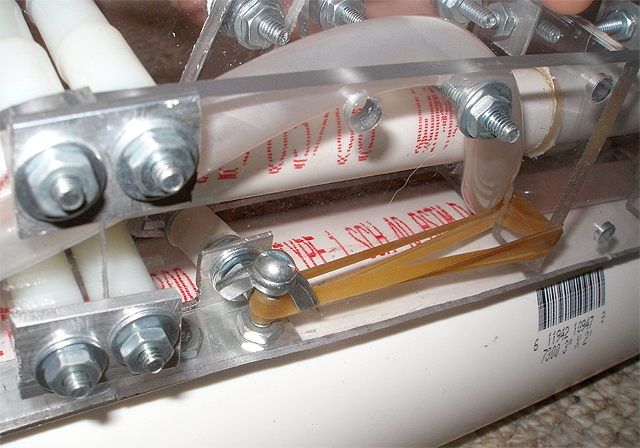
This picture is of the bladder when the gun has around 1350 mL of water in it. It bends and twists. It's a new bladder, for I had to replace the older one because it burst. These bends and twists concentrate more stress on the bladder and less stress on the water, meaning decreased performance. I did a riot blast shot for the test, but the twists limited the flow to the point that I didn't think I had the valve open, but I did. To fix the bladder, I'm first going to try to flipping the tubing around and see how that works. The bends and twists didn't seem to matter though; the data were acceptable.
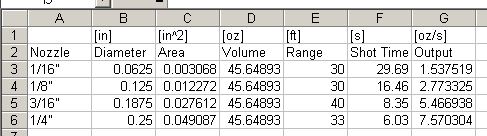
I calculated using a cubic approximation that the best range would be around 43 feet on a 7/32 inch nozzle. That's around the expected values for a single layer of LRT; for two layers I would expect at least 50 feet.
This picture is of the bladder when the gun has around 1350 mL of water in it. It bends and twists. It's a new bladder, for I had to replace the older one because it burst. These bends and twists concentrate more stress on the bladder and less stress on the water, meaning decreased performance. I did a riot blast shot for the test, but the twists limited the flow to the point that I didn't think I had the valve open, but I did. To fix the bladder, I'm first going to try to flipping the tubing around and see how that works. The bends and twists didn't seem to matter though; the data were acceptable.
I calculated using a cubic approximation that the best range would be around 43 feet on a 7/32 inch nozzle. That's around the expected values for a single layer of LRT; for two layers I would expect at least 50 feet.
Last edited by Drenchenator on Wed Jul 29, 2009 7:44 pm, edited 1 time in total.
The Drenchenator, also known as Lt. Col. Drench.
-
C-A_99
- Posts: 1502
- Joined: Tue Aug 01, 2006 11:09 pm
Re: Riptide CPS Prototype
Yet another annoying part of LRT. There's got to be a way to unbend the tubes when they ship over or are taken out of storage. My LRT in my CPH bends quite a bit as well.
Perhaps I should move this thread to Notable Homemades... but I'd rather have the approval of others before doing so.
Edit: Done.
Perhaps I should move this thread to Notable Homemades... but I'd rather have the approval of others before doing so.
Edit: Done.
Last edited by C-A_99 on Tue Jul 28, 2009 11:16 pm, edited 1 time in total.
-
SSCBen

- Posts: 6449
- Joined: Sat Mar 22, 2003 1:00 pm
Re: Riptide CPS Prototype
If you think it's notable (and it is), feel free to move it without asking.
Aside from that, I'd just like to say it's a nice water gun and definitely the start of something good, especially given that I've handled it directly.
Aside from that, I'd just like to say it's a nice water gun and definitely the start of something good, especially given that I've handled it directly.