Thanks for all the compliments. I tend to go overboard on the hard work sometimes when I am excited, so this thing is pretty high quality as far as I am concerned. A guide is in the works as well. I have about 180 pictures taken of the construction so far, so this one will be detailed. If anything, people should look at the guide just to see how I build the pump, it is much higher quality that anything else in soakers.
Why did you use pipe nipples and metal fittings for part of the design?
To tell the truth, the only steel fitting is the tee, which is where a lot of the weight comes from. I used metal fittings because I thought that they would be smaller (in length), which is true many times. But they do add a lot of unnecessary weight. I didn't use them because I though there would be a lot of pressure, in fact, I am sure that the bladder would explode before even PVC would. I may "upgrade" the trigger valve later by replacing most of it with PVC, which should reduce the weight a ton.
One note though, on my use of check valves. I tried to only use locally available parts (excluding the tubing of course, which is technically locally available because Ben has some in my house). The shortest check valves that I found were not
spring check valves, they were
swing check valves. Spring check valves operate by the use of a spring holding shut a door, but swing check valves don't have anything to hold the door shut, except gravity of course. This means that they can't be used in certain circumstances (like upside down mostly). They do decrease the length substancially though. They increase the height as well, but this is no problem because I made it so that they increase the height into "dead space" (where nothing was the 1 1/2" PVC case). Another possible "upgrade" for this gun would be the use of regular run of the mill spring check valves.
But you say that the trigger problem stems from the fact that the wire is attached too close to the ball valve screw. Could you explain why this is? If the problem is related to what I said in the above paragraph, then perhaps that would work.
Actually, I thought that I said that I moved the wire there to reduce the pull needed (not the force, just the length of pull needed). A circle has less circumference when it the radius is smaller, right? So I reduced the radius, which in turn should reduce the distance needed to open the valve (but increase the force).
The problem is actually coming from the friction of the wire against the PVC case and elbow adapter, and from the limitations of what I have built already (the trigger can only go back so far at the moment, put I can increase the pull by increasing the length of "trigger hole".
The trigger is positioned fairly far forward on the soaker, but if it's still balanced as you say where the handle should be, I suppose that isn't too bad (also, it keeps the pump close to the handle).
I have to agree that they are a bit to far forward, but I designed it to be this way. I did some measurements beforehand of where the handle and trigger are in relation to the end of the soaker on the few soakers that I have available (XP 150, CPS 1000, CPS 1200, and CPS 2100). It seems that most grips and handles are about 8 to 9 inches from the end of the soaker, while mine is 10 or 11 inches I believe. It is just a matter of preference I suppose, because the soaker feels fine to me.
By the way, what lies in the back part of the tubing? I doubt the pump tube reaches that far back, but still...the soaker would be even shorter if not for it, but I'm sure it's there for a purpose.
I am surprise that I didn't actually show that part, but I took some pictures that should explain a lot. This soaker is not as complicated as many of you may think, because I designed it to work pretty much like a stock soaker. It was just very complicated to build.
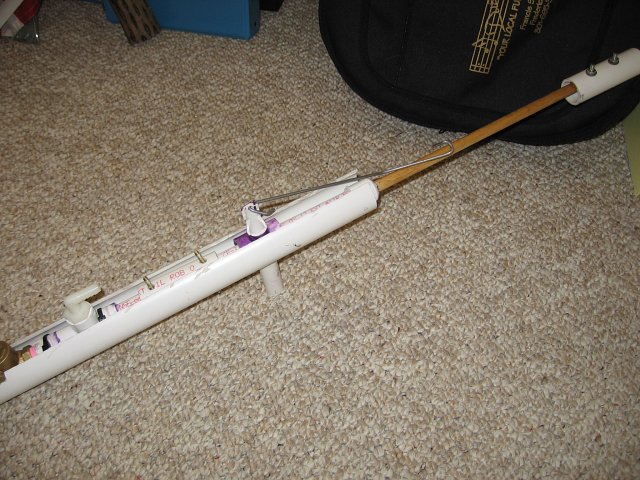
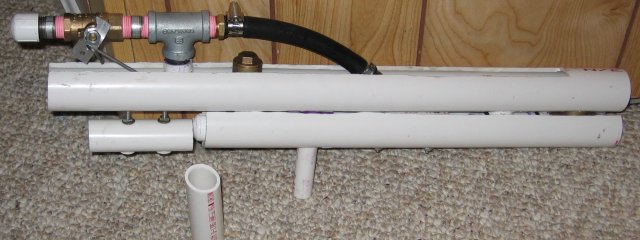
This is the entire "lower layer" of the soaker. It contains the pump and the input check valve. The elbow barb is just the output of the pump, and is easily connected to the trigger valve with a piece of vinyl tubing. The pump has a volume of 60 mL and is 12 inches long.
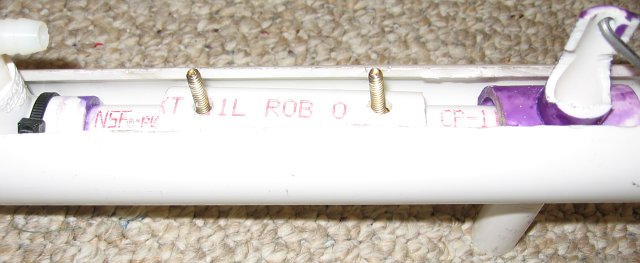
The center of the lower layer contains the most vital structural component. This piece of 1" PVC easily fits over the pump shaft, and allows the four screws to connect the bottom of the lower layer to the center layer easily. This was one of my completely original ideas. It also is the only way that I can see a soaker like this being constructed without "external help" currently, so hopefully someone will take where I left off and build a newer, better system.
The trigger is on the right in that picture (and near the center of the first picture). This trigger system is pretty much a copy of the one used on many CPS soakers.
This internals shot of a CPS 2100 should show how. Somehow, I had to get the trigger that is underneath the pump, to pull on a wire over the pump. So, I drilled a 7/8" hole straight through a 2" long of 1" PVC, and cemented a 5.5" piece of 1/2" PVC into it. I then drilled a hole through the center of the 1" pipe, clearing it for the pump to get through. It is just your basic "tracked trigger".
The top of the trigger was cut down to allow the tubing to go by too. Surprisingly, that took me a long time to think of. Originally, I drilled a 1/2" hole in the pipe to allow the tubing to go through. This offered so much resistance that the trigger could barely work. So I made the hole bigger. And bigger. This is until I realized to cut one side off and leave one on. Now it works well.
Actually, the soaker would be nearly as short as my compact APH if you increased my APH's pump past its measly 6 inches...
That's pretty funny, because this thing has a 12 inch pump. I also just noticed that this thing's heavy weight could be due to the density of it. It has a lot of stuff in a very small space.
How much resistance to you get from the trigger? It seems like since it is connected to the valve so close to its pivot point that it would require a great deal of force to turn it.
I actually get a lot of resistance from the trigger. From how close the wire hole is and from the friction of the wire against the casing. I have a lot of work to do, mostly just tinkering with it to slowly fix these problems. The soaker is basically operational, just not optimally.
It does require a lot of force of open the valve. But I am trying to balance opening the valve all the way against comfort, so at the moment I am more concerned with opening the valve all the way. Hopefully once I get that to happen some lubrication will help open the valve easier. Since I am the first one to do this kind of stuff in soakers, I have to settle for functionally over comfort.
Do you think a homemade valve would have been a better option?
Originally, I designed this gun to use a homemade pull valve. Ben brought it up in a
Soaker Media topic that I have designed a homemade pull valve using rubber sheeting in early July when I started building this gun. To tell the truth, this design is the redesign of a
failed first design using a homemade valve. I removed it for two reasons. The pull valve would not allow linear flow and therefore decrease the laminar flow. The pull valve also would not be repairable and also be a pain to build. This way is not like the one in my Nerf homemade, which is very easy to repair (just remove the piston). This one was a true copy of a standard Super Soaker pull valve, and would have the same problems as them too.
I removed the homemade valve from my plans simply because it would not perform as well. I do have some fairly vague "goals" for this gun, which are pretty much a 50 foot range (easy in homemade guns), and having a huge bladder/chamber capacity. There is a reason that this thing does not have a reservoir, I think that it does not need one! The only "effective" water is the water in the bladder/chamber, so I designed this thing with plenty of space for the bladder. And if worst comes to worst, I can use my SS 300 backpack.
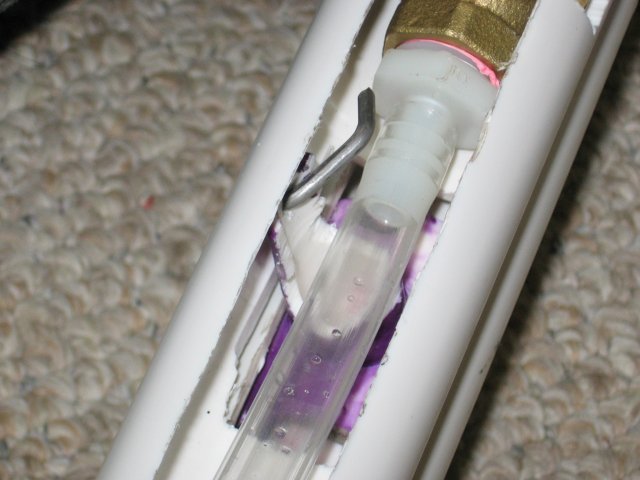
In the redesign, I settled for just a simple brass ball valve. The old saying "Keep It Simple Stupid!" really got me before, so I went for a simple route. The hardest part with using a brass ball valve is the you have to create the new torque are, but once that is done, it is ready to use. And if the valve breaks, you can buy a new one and use the old torque arm. A much simpler repair system.
The Drenchenator, also known as Lt. Col. Drench.


