THR water gun

Homemade water gun threads that are notable.
User avatar
SSCBen
Posts: 6449
Joined: Sat Mar 22, 2003 1:00 pm

THR water gun

Post by SSCBen » Wed Jan 02, 2008 2:12 am

Here's something I was working on today as a break from website work:

Image

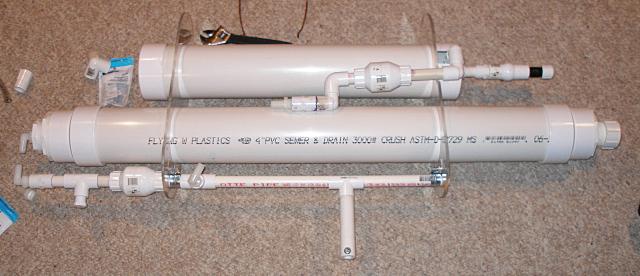
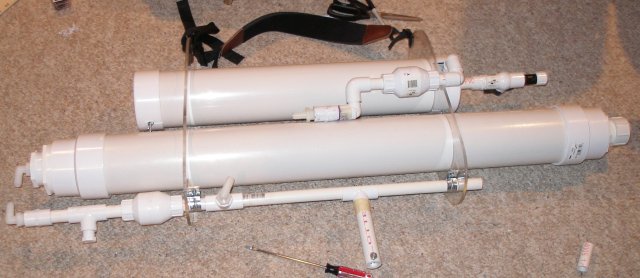
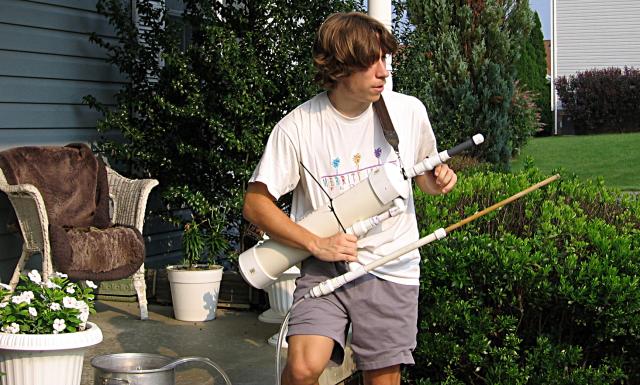
The gun's going to be called THR (Tactical High Range water gun). This is my response to some shortcomings people have seen in my homemade water guns. Specifically, it's a response to the lack of an included reservoir. This is just what I've completed today, so it's far from complete. You can get the basic gist of the design from the image above, but it has nothing showing the pump system, the handle, the strap, the nozzle selector, etc. The innovation here is the use of a plexiglass structure, which allows different designs with a lot of structural stability at a low weight. Okay, maybe it's not an innovation because I got the idea from Lonnie Johnson's prototype Super Soaker. :p

The plexiglass is nice because it allows for a lot of water storage without the gun changing into hard to hold shapes or the gun getting wider. Basically, this gun will be easy to hold because it's just two pipes with one on top of the other. That was one reason I never made a gun with an included reservoir, but now I think I have the answer.

Powering this water gun will be a very thick CPS chamber that should easily reach 55 feet effective range, if not more. Combine that with a big PC and big water capacity, and this gun will last a while.

I'm experimenting with water reservoir lengths and pump lengths. I'm going to start long and see how I like both. Right now the reservoir is 36 inches of 4 inch drain pipe, which is about 7.4 L. The pump I plan to start at 18 inches, which is 60 mL. The cool thing about this design is that it uses long lengths of pipe in a way that nearly any size water gun is possible. If I decide this one is too long, I can shorten it without redoing the entire water gun. Very cool.

I'm lucky to have not very cold weather right now, I guess. Not everyone can work on water guns at the moment.

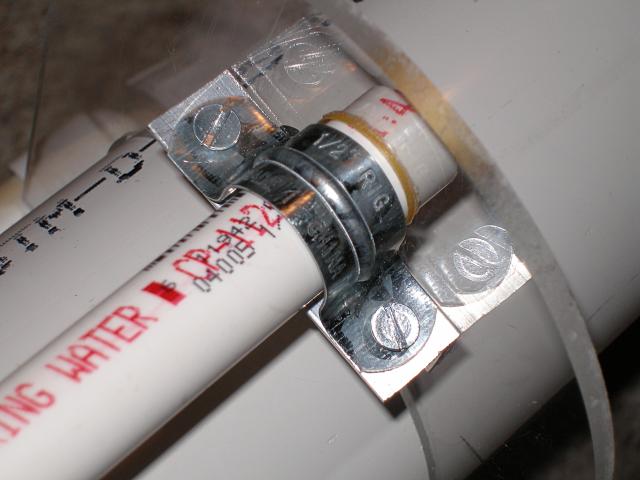
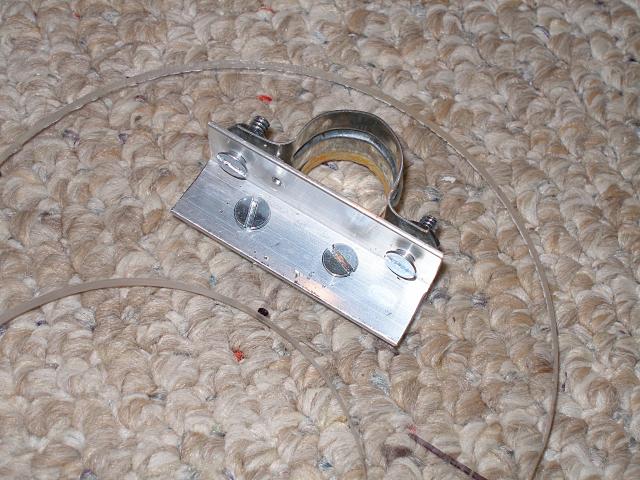
I'm really liking how it's turned out so far. For an hour or two of work, it's great. Most of the time was spent using a router to cut the plexiglass and sanding it smooth afterward. After that I just had to cut the pipe and plug some PVC together to get what you see. I've walked around with it and it seems easy to hold and light. Using PVC drain pipe was a good idea. This water gun is strong, but very light.

For those interested, this gun will not be on SSC immediately after we update. I'd like to save this for a later update. It's non-essential to the major update in my mind.
Last edited by SSCBen on Wed Jan 02, 2008 3:45 pm, edited 1 time in total.

User avatar
Silence
Posts: 3825
Joined: Sun Apr 09, 2006 9:01 pm

Re: THR water gun

Post by Silence » Wed Jan 02, 2008 4:57 pm

Looks good. My only suggestion is to try using large rubber tubing (for the inner layer) and a slightly larger barrel. If you can screw on a plastic firehose nozzle from McMaster-Carr, you'd naturally get more range.

I'm wondering if you could just widen the bore from 1/2" to 1", but then use a firehose nozzle to get an aperture of 3/8". The end result might still be good.

User avatar
SSCBen
Posts: 6449
Joined: Sat Mar 22, 2003 1:00 pm

Re: THR water gun

Post by SSCBen » Wed Jan 02, 2008 6:08 pm

I tried using 1 inch latex tubing before in a water gun, and it wasn't worthwhile. I think I put a bit about that in my CPS homemade article on the new website. Basically, while you can get more flow on large nozzles, you can't get more pressure easily (they don't make tubes larger than the 1 inch ID one, and few larger than the 3/4 inch ID). Because the 5/8 inch ID of the PVC is smaller than most nozzles, it doesn't restrict flow substantially. It makes more sense here to get the added benefit of more pressure over the potential for more flow.

The larger tubes also have a lot of dead space that just fills up with water that's not shot.

1/2 inch PVC pretty much is as small as I would go if some performance was desired. I could get over 60 feet of range with 1/2 inch PVC, but more than 65 or 70 is a stretch because those ranges require much more flow.

The gun will use simple endcap nozzles in a selector arrangement, for the moment. Later I'd like to try out a conical one, but they don't make conical nozzles for 1/2 inch NPT threaded pipe, so I'll probably have to make one myself with some rapid prototyping equipment or something similar.
Last edited by SSCBen on Wed Jan 02, 2008 6:22 pm, edited 1 time in total.

User avatar
SSCBen
Posts: 6449
Joined: Sat Mar 22, 2003 1:00 pm

Re: THR water gun

Post by SSCBen » Fri Jan 04, 2008 3:54 am

Today I bought a few more parts I needed and did some work on the pump. I needed a way to attach the pump firmly to the plexiglass, and I improvised one based upon what was available in the store. It works great! I'm surprised with my luck improvising here.

Image

Above is an overview of the water gun. You can see the pump is attached with something, but you'll need a closer look to see what.

Image

Here's a closeup on the front clamp. I used pipe straps, an aluminum bar, nuts, and bolts to make something that could clamp onto the pump. It's a very solid clamp. The pump can't move forward or backward in the clamps. It can, however, move slowly from side to side. I'll add some rubber from bike tubes to prevent that. Overall, I'm more than happy with this.

The cool thing about using these clamps is that I can remove the pump if I need to. A goal of mine is to make this design as easily repairable as possible. If the pump breaks, no problem. That can be replaced without hassle.

These clamps are really cool. You could construct an air pressure water gun similar to this with 4 clamps instead of two. Two of the clamps would replace the top 4 inch pipe which is a pressure chamber here. Of course, you also could use a piston air chamber with a piece of 4 inch PVC pipe (not drain pipe) and have another similar design. The mounting bracket design is very flexible.

Image

Here's another angle of the clamp on the plexiglass bracket.

I forgot to buy a washer for the pump and a dowel rod for the pump, but other than that, I have everything I need to complete the water gun.

While building this water gun I realized something about most homemade water gun designs. DX previously categorized water gun designs as 2D and then said 3D had benefits over 2D, which I would say isn't true simply because there are good 2D designs as well as 3D designs. My categories make a little more sense.

Most homemades are made with a pipe structure, i.e., there is no structure aside from the pipes. My THR water gun is made with a mounting bracket of some sort that allows parts to be mounted on something else. And other homemades use a structure more like manufactured water guns, i.e., the mounting parts inside of something. The latter only has one example so far, Drenchenator's water gun from a while back.

None of the options are necessarily better than the others. It just depends on what you're doing, how you want to do it, and how much time you are willing to put in. Pipe structures are the easiest and most obvious design types, but thye offer the least flexibility in positioning. Some of that can be solved by doing duct taping parts onto each other, but that's messy. Mounting brackets are a little harder to do and more expensive, but they give you a lot more flexibility in positioning of parts. Having an internal structure is similar to a mounting bracket, that is, it takes more time and will cost more, but gives you more flexibility in the position of parts.

Edit: I was thinking about handle location for a few minutes. I'm considering positioning a handle below the check valve nearest to the nozzle. That'd reduce how far I'd have to read to hold the gun, which could reduce arm fatigue. It's an interesting idea. I think I'll have both.

Note to self: Buy some washers, wooden dowel, and a handle.
Last edited by SSCBen on Fri Jan 04, 2008 4:11 am, edited 1 time in total.

User avatar
Silence
Posts: 3825
Joined: Sun Apr 09, 2006 9:01 pm

Re: THR water gun

Post by Silence » Fri Jan 04, 2008 9:39 pm

The water gun is certainly taking a unique shape. At first glance, I would say the Plexiglass pieces might be a bit poky, but perhaps not. Regardless, it does look like a solid solution. Mine would've been duct tape.

A clearer way of explaining the THR's structure would be, "the internals themselves form a complex structure."

I would add the handle(s), if necessary, last. At least fill the water gun with water before deciding on handle locations. Balance could definitely be different with a full water gun. (You might have already done this, though.)

User avatar
SSCBen
Posts: 6449
Joined: Sat Mar 22, 2003 1:00 pm

Re: THR water gun

Post by SSCBen » Fri Jan 04, 2008 10:55 pm

The plexiglass seemed like it would poke me as well initially, but after walking around with it I wasn't worried. I designed the gun to be held similar to my CPS water gun. Holding water guns under my arm seems to work well for me. The plexiglass doesn't even touch me the way I hold it.

Nope, I didn't add handles yet. I figured that I might change my mind after seeing how it works.

The pump placement seems low to me though. Once I get the parts for that I'm going to do a few tests to see how well it works that low.

The reservoir also could be shortened, which might help the pump by making it more accessible. Right now it seems really long.

User avatar
SSCBen
Posts: 6449
Joined: Sat Mar 22, 2003 1:00 pm

Re: THR water gun

Post by SSCBen » Sun Jan 13, 2008 2:18 am

I never posted any updates to this project.

I'm near completion. At this point all I need to do is cut the reservoir and pump shorter and PVC cement it together. After a few clamps and cable ties, it's done. I've accomplished most of what I set out to, aside from a rotating nozzle selector that I'll work on later as an upgrade.

Image

You can see that I added a strap. You can barely see the other addition I made. The PC caps are now attached with screws semi-permanently. They can't come off unless I want to. This allows for quick repairs without disassembling the entire water gun.

User avatar
Silence
Posts: 3825
Joined: Sun Apr 09, 2006 9:01 pm

Re: THR water gun

Post by Silence » Sun Jan 13, 2008 4:03 am

Nice improvements...I can see that the little details count tremendously.

The strap mount points are quite convenient for the water gun's design and for use as well. Did you design the water gun with the strap mount locations in mind?

Pressure chamber case screws should be an obvious point for CPHs. I personally would have gone with a screw-on cap, but your method is cheaper, lighter, and less permanent. There's no need or desire to keep a seal, after all.

EDIT: Any updates on range?

User avatar
SSCBen
Posts: 6449
Joined: Sat Mar 22, 2003 1:00 pm

Re: THR water gun

Post by SSCBen » Sun Jan 13, 2008 5:05 am

Yes, I did think that the plexiglass would help make perfect strap mount points. As I said, I got the idea to use plexiglass after seeing Lonnie use it, and at that point a bunch of things just clicked in my mind. Strap mount points was one of them.

Range-wise I'm looking at 60 or more feet, eventually. Low 50s is the absolute worst I would expect because my redone first CPH could get 52 easily with a piece of LRT that slides freely over the inner one, without an optimized nozzle.

I still need to figure out a way to layer LRT more effectively, but I'm sure I'll figure something out. At worst I'll duplicate the dragged pieces of LRT used on my original CPH back in 2004. Perhaps I should write something about why I do not want to use that method. That will have to be done later because I'm getting ready to go to bed soon. More to come in an edit. ;)

Killer 7
Posts: 34
Joined: Sat Jan 05, 2008 4:22 am

Re: THR water gun

Post by Killer 7 » Mon Jan 14, 2008 4:54 am

Ben in the article I wrote called Layering LRT/CPH chamber it tells you a much easier way to layer LRT. It works right up till you try to get four or so layers on, but I haven't tried to get more than that yet. Very nice gun by the way. I like the plexiglass supports.

User avatar
SSCBen
Posts: 6449
Joined: Sat Mar 22, 2003 1:00 pm

Re: THR water gun

Post by SSCBen » Sat May 31, 2008 3:13 am

I'm going to finish this water gun up as is soon and write a page about it. There are several things I would change but by large what I've done was successful. Hopefully some people can take my proof of concept here and turn it into an even more viable water gun. ;)

User avatar
StormGlorious
Posts: 157
Joined: Tue Jan 01, 2008 10:10 am

Re: THR water gun

Post by StormGlorious » Sat May 31, 2008 10:43 am

That would be totally awesome if you finished it soon Ben.
Would the THR water gun be available from the SSC Store?

Storm,

User avatar
SSCBen
Posts: 6449
Joined: Sat Mar 22, 2003 1:00 pm

Re: THR water gun

Post by SSCBen » Sat May 31, 2008 2:56 pm

Something like THR would eventually be available. It definitely will be changed to be cheaper however. I'll use smaller and cheaper check valves, wood instead of plastic sheet, possibly a different LRT configuration than what I'll do to finish it up here, possibly a different pump location or a shorter pump, etc. I'd also like to experiment with some different options like a trigger. The design is not final but if someone wants me to make one I could.

User avatar
SSCBen
Posts: 6449
Joined: Sat Mar 22, 2003 1:00 pm

Re: THR water gun

Post by SSCBen » Wed Jun 18, 2008 7:32 pm

I'm going to finish THR up in the next few days. It'll be finished similarly to how it looks in the pictures above with a few changes. I'll be using two small check valves, one to replace one of the larger ones, and another in the cap to break the vacuum in the water reservoir. The reservoir will be shortened until it is about the length of the pressure chamber case. The backpack attachment will be removed. The handle will be more firmly attached. There are no other changes planned.

Below are some images I took of the process of making a vacuum breaking cap. The first shows the small check valve I'm going to use and the second shows the diameter of the tubing. A 9/32 inch drill bit is the closest size over that. I'm going to cut the check valve smaller, drill a hole in the cap, and then epoxy it onto the hole. This will be the cheapest and smallest way I know to make a vacuum breaking cap.
Attachments
dscn0039.jpg
dscn0037.jpg

User avatar
Drenchenator
Posts: 807
Joined: Fri Jun 18, 2004 12:00 pm

Re: THR water gun

Post by Drenchenator » Wed Jun 18, 2008 11:08 pm

That's an excellent idea. Much better than a hole in the cap, I must say. I remember seeing those check valves on McMaster and thought they might come in handy for something, and this looks like it! I hope this catches on.
The Drenchenator, also known as Lt. Col. Drench.

Post Reply